Okay, well, I have not been as active as I thought I would in 2011. I hope to do better in 2012!
Happy New Years to whomever reads this and many, many blessings!
Crafty inspirations for memory-keeping and home decor projects, serving the Newark, Delaware community!
Friday, December 30, 2011
Tuesday, October 18, 2011
The Week Ahead
I'm back with another exciting project to upload!
I am working on creating a College Journal for my daughter using the Teresa Collins Freestyle Album kit.
Do you see these beautiful pink and orange colors? I just love it!
The pages are so vibrant.
So over the next few blogs, you will see how I designed each page as I work to complete this project by 10/27! The 28th, my daughter comes home from college, and this baby better be wrapped up and ready for the party (her 19th birthday).
Tuesday, October 11, 2011
I am a New Fiskateer!
Today, I completed my registration and introduction into a new affiliation for me: The Fiskateers!!!
Here is some history about this group:
The Fiskateers are a community of passionate crafters that love to shine a spotlight on their handiwork, and talk openly about the tools they use to create it! This community was spearheaded by the Fiskars company in 2005. They originally recruited 4 very talented ladies from different places, with different crafting styles, to begin blogging about their lives, sharing projects and craft demos, building relationships, and spreading the Fiskars love. As more passionate crafters joined this community, each new Fiskateer was given their very own number, and claimed it as a badge of ownership in the growing movement! The community also claimed Fiskars’ famous orange as they began dressing the part and finding new and creative ways to visually proclaim their place in Fiskateer history!
In 2008, in an effort to engage Fiskateers across the US, Fiskars let each Lead Fiskateer plan and host her own “Fiskafriendzy.” These regional, offline events helped Fiskateers from all over the country get together, share some quality crafting time, and have loads of Fisk-a-Fun!
As a brand new Fiskateer, I will be attending my very first "Fiskaparty" on 10/22/11, where I will meet some of the Leads and learn some techniques using some of my favorite Fiskars tools!
I am so happy about this brand new addition of credentials to my crafting expertise! Can't wait to share what I learn with you guys!


Sunday, October 9, 2011
Altered Book! A Labor of Love
I bought a light brown, leather-bound book and decided to make it completely different. I got this great idea from Marion Smith, over at Live with Prima. This was one of her live classes back in August of 2011!
I really enjoyed the process of "creating" and want to document it here for you. There are definitely things I learned along the way that I will mention, so you can learn and be prepared for, should you choose to do this project yourself.
Here are the pics of the original book, inside page and a random inner page. Originally, this book was a devotional. I got it at my local Goodwill Store for $1.50, and the whole time I altered it, I thanked God for inspiring someone to make such an awesome book.
Once you have acquired a good book to alter, you must coat it's cover with Golden Medium paste mixed with the acrylic paint of your choice. I chose burgundy! Here is what it looks like all painted. You must let it dry thoroughly before continuing, so a heat tool might come in handy.
Then you must alternate between tearing out a bunch of pages, right at the binding, about 1/4 inch worth, and leaving a bunch of pages in your book. The pages that you leave in the binding will be glued together to form a very thick buch of pages, but we will get there in a little bit.
First, make sure that in between each thick bunch of pages, there are equally thick areas of torn out spaces. These spaces are necessary so as you create your new, altered book, you will be able to add 3-D embellishments to those thick pages. This picture shows the width of pages to tear out. Don't worry if it looks sloppy-it's supposed to! That shabbiness is what will give your altered book character!
Next, you need to tear off about a 1/4 strip off of the long edges of the thick pages. This is so the pages will look more tattered and torn later, when we stain them.
Now comes the gluing part, and it is kind of messy. . . . actually VERY messy and my least favorite part of the job. To glue the clumps of pages together, I used a spray adhesive glue, because it is quicker than using a glue stick. But as you spray the glue in between your pages, it gets ALL over your work space! Yuck! It is hard to clean up later!!! You could use a regular glue stick to glue the thick pages together, but it will take a long time. The choice is yours!
Next, spray mist your pages to give them some color. And ink the edges of your pages with vintage photo Distressing ink.
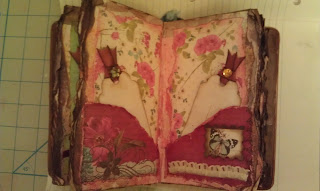
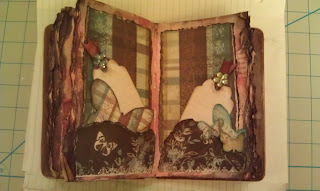
The next phase of this massively long labor of love project is actually my favorite, because it is where you customize each page by adding page ellements and tags that you embellish. Here are a few of my inner pages:
On the small tags, I will write my families and friends names and birthdays and each page will be for one month out of the year. As my list of family/friends grows, I can simply add more tags to each pocket and this will be my virtual Birthday Calendar book. For the front cover, I traced a nice face plate and cut out the leather, leaving an opening to the inside cover. I then embellished the front of the book with Prima bling and flowers.
This book turned out gorgeous, in my typical shabby chic style, but it was very labor intensive (about 25 hours) and very messy (due to spray glue and all the inking and painting). I would recommend keeping your other working tools, such as paper trimmers and rulers, far from the glueing and inking station. If not, you will have to clean all that up at the end. You also will need to do a lot of handwashing throughout the process, so that you do not contaminate one group of pages with the colors of another grouping.
I am glad I did this project, but will probably not teach it as a group project due to it's labor intensive process and due to lack of space in my studio--I was so spread out with all my tools, I don't know that anyone else would have fit at my workstation!
If you'd like to see the "master" instructor demonstrate how to do this class on Ustream, log into http://www.livewithprima.com/ and look for the Marion Smith Altered Book under August 2011 archives. All the prima instructors are super friendly and mega talented. I've learned oodles from them!!
Happy Crafting and remember to Shine it Forward!
Subscribe to:
Posts (Atom)


